Aim:
I wanted to refine my idea of what a 442 should be, balance across both flanks be that in defence, transition or attack. As I'm not a fan of symmetric formations, the task was to achieve this on both sides but in different ways.
History:
My previous incarnation of the 442 had looked like the below.

While I was not totally happy with my right flank it was the left that was my bigger concern. I was not happy with how the defensive and transition phases were going on either flank.
Resolution:
Right Flank, I switched to a Defensive Winger which I felt automatically gave me greater security, the downside it affected my attacking threat. The natural solution was to turn my Wingback duty from support to attack.
In addition, I decided to use a Pressing Forward (PF) instead of the Trequartista, this added to my attacking threat from that area. I did go back and forth on this decision but preferred the work of the PF when defending in a 442.
Left Flank, the bigger concern was the Box To Box Midfielder (BBM) who I felt roamed to much and left the midfield exposed. I opted to change the BBM to a Centre Midfielder on support, this solved my issue of more defensive security. I dropped my Wide Midfielder to support and increased my Fullback to attack again for more defensive security and closer support in transition.
I now have nice overlaps on both flanks, with a better shape when in transition.
The new formation looks like this.

Individual Instructions:
BPD and CB - Shorter Passing
FB - Cross From Byline (CFB), Shoot Less Often
WB - Shoot Less Often
DW - CFB, Take More Risks
CM - Take More Risks
WM - Stay Wider, Run Wide With Ball, Dribble More, Cross More Often, CFB, Take More Risks
Team Instructions:
I will cover a few of my instructions and my thoughts behind them below briefly.
Balanced mentality and Shorter Passing are used to offset the Extremely High Tempo in terms of passing directness.
Work Ball Into Box as I want to move the ball quickly in transition but slow down and create good chances in the final third. As I’ve used this the instruction Shoot Less Often is not used as much, as for me it would be overkill.
Pressing I wanted to be in my opponents faces and I toyed with using a split block but decided on this occasion Extremely Urgent worked better with the team. Extra pressing will be provided on the right flank by the PF and DW. Taking this into account I didn’t feel Counter-Press or other pressing instructions were needed.
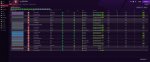
Results:
I have included results with both Liverpool and Aston Villa, both holidayed over a season with Assistant Manager in charge.
I wanted to refine my idea of what a 442 should be, balance across both flanks be that in defence, transition or attack. As I'm not a fan of symmetric formations, the task was to achieve this on both sides but in different ways.
History:
My previous incarnation of the 442 had looked like the below.
While I was not totally happy with my right flank it was the left that was my bigger concern. I was not happy with how the defensive and transition phases were going on either flank.
Resolution:
Right Flank, I switched to a Defensive Winger which I felt automatically gave me greater security, the downside it affected my attacking threat. The natural solution was to turn my Wingback duty from support to attack.
In addition, I decided to use a Pressing Forward (PF) instead of the Trequartista, this added to my attacking threat from that area. I did go back and forth on this decision but preferred the work of the PF when defending in a 442.
Left Flank, the bigger concern was the Box To Box Midfielder (BBM) who I felt roamed to much and left the midfield exposed. I opted to change the BBM to a Centre Midfielder on support, this solved my issue of more defensive security. I dropped my Wide Midfielder to support and increased my Fullback to attack again for more defensive security and closer support in transition.
I now have nice overlaps on both flanks, with a better shape when in transition.
The new formation looks like this.
Individual Instructions:
BPD and CB - Shorter Passing
FB - Cross From Byline (CFB), Shoot Less Often
WB - Shoot Less Often
DW - CFB, Take More Risks
CM - Take More Risks
WM - Stay Wider, Run Wide With Ball, Dribble More, Cross More Often, CFB, Take More Risks
Team Instructions:
I will cover a few of my instructions and my thoughts behind them below briefly.
Balanced mentality and Shorter Passing are used to offset the Extremely High Tempo in terms of passing directness.
Work Ball Into Box as I want to move the ball quickly in transition but slow down and create good chances in the final third. As I’ve used this the instruction Shoot Less Often is not used as much, as for me it would be overkill.
Pressing I wanted to be in my opponents faces and I toyed with using a split block but decided on this occasion Extremely Urgent worked better with the team. Extra pressing will be provided on the right flank by the PF and DW. Taking this into account I didn’t feel Counter-Press or other pressing instructions were needed.
Results:
I have included results with both Liverpool and Aston Villa, both holidayed over a season with Assistant Manager in charge.
Liverpool:


Aston Villa:


Aston Villa: