I have a firm belief that I have the greatest footballing mind of my generation. Have I ever managed a football team? No. Have I ever won a top division league in FM without using the editor? No. Do I have any credentials at all to back up the statement I just made? Also no. However, this beautiful, beautiful tactic is an irrefutable testament to my claim.
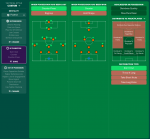
5-4-1 Diamond
Before getting into details, here's the tactic:


Individual Instructions
Every player is on default instructions other than:
- Both Wingbacks (WB):
* Stay wider
* Mark tighter
- Attacking Midfielder (AM):
* Move into channels
* Roam from position
- Advanced Forward (AF):
* Roam from position
Preferred Foot
I actually like most types of fee-Just kidding. The only position where I think preferred foot matters a lot is on the wingbacks, who I like to prefer the side that they're playing on, I.E., the left foot for the left WB and the right foot for the right WB. Other than that, it's nice to have the outer CB's preferred feet be the same as the side they're on, and the mezzala's to prefer the opposite feet to their side, but these aren't essential.
Types of players
The three Central Defenders:
All three CBs should be dominant in the air, at least decent at passing, while the wider CBs should be quick as well. Put your most aerially dominant CB in the middle of the three.
The two Wingbacks:
The Wingbacks have to be quick, have high stamina, and be good at passing and crossing, as well as decent at dribbling (although this isn't essential).
I prefer NOT to play players that like to dribble in this position.
The Defensive Midfielder:
Here, you'll want someone who's tall, can run a lot, and is decent at defending. Anything else is a bonus.
The Two Mezzalas:
This position is for your two creative players. Good passing and vision is needed, while they must also be decent at finishing. Good stamina and work rate is preferable due to how much defensive work they must put in.
The Attacking Midfielder:
You're going to want to put your most well-rounded player here. Someone who's quick, good at finishing, and can pass, but also someone with good stamina and work rate so that they can help out in defense. I prefer someone better at attack over someone hard working/defense-minded if there isn't a player who's good at both.
The Advanced Forward:
Look for a standard pacey striker for this position, anyone who can run around quick and put the ball in the net when needed is good enough.
The feeloshofy
Okay, so here's where my humongous footballing brain can shine. This beautiful, beautiful tactic is all about maximizing the number of players on attack and defense at any point. Smothering the opposition with players on defense, and stretching them out with players on attack.
Attack:
This is not a counterattacking tactic, but neither is it a possession-hogging tactic. I'd say that it's a bit in the middle of both. On attack, the ball will mostly be bounced around from wing to wing until someone crosses or a wingback finds a mezzala unmarked out wide in the box. However, the single striker can be sent through with a long ball for a counter if the situation permits.
In terms of roles, every player other than the three central defenders gets involved at the opposition's third. The AF behaves like any lone striker, making sure the opposition back line doesn't get too comfortable, while the AM helps build up play initially, but also runs into the box as a second striker when needed. The attacking Mezzala serves as a late-arriving striker, getting into the box when someone out wide is ready to cross. The wingbacks are the heart and soul of this team. They are essential in stretching the opposition, and due to the presence of the two Mezzalas, are usually always left unmarked out wide, leading to easy outlet passes for any player when pressured. The DM essentially lurks outside the box, playing simple passes and recycling possession when needed.
Defense:
On defense, the team presses high and hard, but doesn't over-do it; this isn't a high-octane Gegenpressing tactic or anything. The opposition is forced to play out wide, because the tall CBs and DM can generally deal with most crosses that come through. The tactic is very defensively sound because every player other than the AF comes back to help on defense, including the AM.
The 5 defenders obviously provide more cover than most 4atb formations. However, there's a lot more to it. The 5 defenders mark players as you'd expect, while the 4 midfielders roam around the pitch like a marauding horde: closing down the ball wherever it is, although they do tend to lay off once the ball gets too wide. This forces teams to put in more crosses, which as mentioned, the defense should be set up to deal with easily.
Results:
I have used this tactic on a Hull Save with great success, winning the league in my first season, gaining promotion to the Premier League in my second season, and now sitting at 9th in the Premier League with 14 games played. All of this was done with a transfer spend of €61,000 season 1, €4,800,000 season 2, and €14,000,000 season 3. I also had one of the lowest wage budgets for every season bar the first one.


Using this tactic, my starting goalkeeper also holds the Hull record for most clean sheets in a season with 30, and I also got Hull's record for most consecutive league clean sheets by going 11 straight games without conceding. All this shows that you don't need the best players for this tactic to be successful, just appropriate ones.
5-4-1 Diamond
Before getting into details, here's the tactic:
Individual Instructions
Every player is on default instructions other than:
- Both Wingbacks (WB):
* Stay wider
* Mark tighter
- Attacking Midfielder (AM):
* Move into channels
* Roam from position
- Advanced Forward (AF):
* Roam from position
Preferred Foot
I actually like most types of fee-Just kidding. The only position where I think preferred foot matters a lot is on the wingbacks, who I like to prefer the side that they're playing on, I.E., the left foot for the left WB and the right foot for the right WB. Other than that, it's nice to have the outer CB's preferred feet be the same as the side they're on, and the mezzala's to prefer the opposite feet to their side, but these aren't essential.
Types of players
The three Central Defenders:
All three CBs should be dominant in the air, at least decent at passing, while the wider CBs should be quick as well. Put your most aerially dominant CB in the middle of the three.
The two Wingbacks:
The Wingbacks have to be quick, have high stamina, and be good at passing and crossing, as well as decent at dribbling (although this isn't essential).
I prefer NOT to play players that like to dribble in this position.
The Defensive Midfielder:
Here, you'll want someone who's tall, can run a lot, and is decent at defending. Anything else is a bonus.
The Two Mezzalas:
This position is for your two creative players. Good passing and vision is needed, while they must also be decent at finishing. Good stamina and work rate is preferable due to how much defensive work they must put in.
The Attacking Midfielder:
You're going to want to put your most well-rounded player here. Someone who's quick, good at finishing, and can pass, but also someone with good stamina and work rate so that they can help out in defense. I prefer someone better at attack over someone hard working/defense-minded if there isn't a player who's good at both.
The Advanced Forward:
Look for a standard pacey striker for this position, anyone who can run around quick and put the ball in the net when needed is good enough.
The feeloshofy
Okay, so here's where my humongous footballing brain can shine. This beautiful, beautiful tactic is all about maximizing the number of players on attack and defense at any point. Smothering the opposition with players on defense, and stretching them out with players on attack.
Attack:
This is not a counterattacking tactic, but neither is it a possession-hogging tactic. I'd say that it's a bit in the middle of both. On attack, the ball will mostly be bounced around from wing to wing until someone crosses or a wingback finds a mezzala unmarked out wide in the box. However, the single striker can be sent through with a long ball for a counter if the situation permits.
In terms of roles, every player other than the three central defenders gets involved at the opposition's third. The AF behaves like any lone striker, making sure the opposition back line doesn't get too comfortable, while the AM helps build up play initially, but also runs into the box as a second striker when needed. The attacking Mezzala serves as a late-arriving striker, getting into the box when someone out wide is ready to cross. The wingbacks are the heart and soul of this team. They are essential in stretching the opposition, and due to the presence of the two Mezzalas, are usually always left unmarked out wide, leading to easy outlet passes for any player when pressured. The DM essentially lurks outside the box, playing simple passes and recycling possession when needed.
Defense:
On defense, the team presses high and hard, but doesn't over-do it; this isn't a high-octane Gegenpressing tactic or anything. The opposition is forced to play out wide, because the tall CBs and DM can generally deal with most crosses that come through. The tactic is very defensively sound because every player other than the AF comes back to help on defense, including the AM.
The 5 defenders obviously provide more cover than most 4atb formations. However, there's a lot more to it. The 5 defenders mark players as you'd expect, while the 4 midfielders roam around the pitch like a marauding horde: closing down the ball wherever it is, although they do tend to lay off once the ball gets too wide. This forces teams to put in more crosses, which as mentioned, the defense should be set up to deal with easily.
Results:
I have used this tactic on a Hull Save with great success, winning the league in my first season, gaining promotion to the Premier League in my second season, and now sitting at 9th in the Premier League with 14 games played. All of this was done with a transfer spend of €61,000 season 1, €4,800,000 season 2, and €14,000,000 season 3. I also had one of the lowest wage budgets for every season bar the first one.
Using this tactic, my starting goalkeeper also holds the Hull record for most clean sheets in a season with 30, and I also got Hull's record for most consecutive league clean sheets by going 11 straight games without conceding. All this shows that you don't need the best players for this tactic to be successful, just appropriate ones.