Introduction:
So I’ve been away for a while and not posted a tactic for a good year now and I’m back to have a stab at getting the top spot on the leader board for the BEST TACTIC on FM21… it’s a bold claim but ive created something which is scary good and makes some of my previous tactics look mediocre at best. As a SPURS fan I decided when Mourinho was sacked (thank god) to create a tactic that emulated how I wanted spurs to play and with the most prominent choice coming up being Ten Haag I wanted to try and use some of his philosophies around movement and short passing into the tactic and the results will speak for themselves.
in this write up I will cover off how the tactic works fundamentally and how that performs within the match engine, included in this part will be what I look for in each individual role and my preference of player with key attributes listed for each position. I will show you some highlight results along with the league table and champions league on my save with Hertha Berlin where I have just won the CL for the second time in succession and along with the DFB-Pokal cup and Bundesliga both for the second time. I will show all results from the season and see some of the scoring exploits of the team showing some of the top performers showing that the team isn’t world class in any way shape or form and that the tactic has elevated the team to heights that even I didn’t think was possible. Finally I will cover off any miscellaneous items such as training and opp instructions and what to do if down to 10 men etc.
This tactic is plug and play and is quite a typical shape so most teams can put in a team and get success, anyone familiar with my previous work this will be lengthy and detailed write up so strap yourselves in for that, if you would prefer to try it without the write up then go ahead you wont be disappointed and refer back to this if you run into any problems… I look forward to see and hear how your getting on if you use the tactic and am excited to see how high up the tactic testing league this can get.
433 ALL-IN.fmf
OK with that out of the way let’s get into it shall we.
Contents:
1. The Tactic

As I explained before this tactic was inspired by the sacking of the spurs boss and how I envisage how football should be played but a caveat to that is that the most likely incoming manager at the time was Ten Haag and his footballing philosophy intrigued me so I tried to incorporate some of his methodology into the tactic especially how the short passing and intense movement to create chances and also the intense press when in transition to force the turn over to regain possession higher up the pitch by outnumbering the opposition player on the ball to force the ball long or backwards at all costs.
The Advanced Playmaker in CM is my pride and joy in this tactic, he is my Patrick Mahomes, he will just roam around the entire pitch keeping up with play and have the freedom to make all sorts of passes from short intricate passing exchanges to long switch balls to the flanks, always looking to do damage to the opposition, however WHY I like this so much is the fact that the supporting players around him are looking to get further forward so the AP will more often than not find himself the furthest back CM and will only be forces up the field by the IWB coming up behind him leading to him being on the edge of the 18 yard box for a cut back, I started out with a DLP on defend but he would get lost in deeper positions and not have an influence on the game, even on support he would start far too deep and not be able to keep up with play, when I changed to an AP on support he would start higher and the average ratings would improve but he would be too concerned with the space left behind and wouldn’t get to the desired attacking position on the edge of the box, so I went the other way and put on attack with get further forward similar to the MEZ and this didn’t work as he wouldn’t show for the shorter balls on the defensive phase when building up from the back but when I took off get further forward everything clicked, he would show the ball in EVERY phase of the play and be the top of a triangle with the CB and when attacking with the IWB, but also be the bottom of the triangle with the attacking MEZ on either side and the bottom of a diamond with the AF being the spearhead. I watched some of the games on full match and highlighted JOSE (my AP at the time, ill show you him later) and he was everywhere linking everything, didn’t get assists in the game but he was the pass before the assist multiple times and without the AP doing this it would not be nearly as effective however the AP in a quick counter and when the MEZ has the ball they can carry rather than give off to the AP but worry not he was always there for the pass to help if required.
Defensively this tactic shapes up as a quite basic 433 with the wide players dropping in to cover off the overlap and the 3 CM all engage in high press and don’t allow the ball to be in the centre of the park for any time at all thus forcing the opponents wide where the wingers and FB are ready to pounce and steal the ball for a counter, if the opposition gets the ball in a wide area then they will met with a winger pressing the FB and our FB pressing the ball if its in our final 3rd but typically it would go to a FB which is our winger pressing, the 3CM will close up behind this to cut off the short passing lanes forcing the person in possession to go backwards to the keeper or try a risky ball into the centre or a cross field ball to the other wing where tour winger and FB are ready to intercept
In transition from DEF to ATT the team will move very quickly to make space for passes and/or through balls, this is done by the AP moving towards the player on the ball for a shorter option and the MEZ push beyond the opposition CM to receive the ball on the run, the wingers on support will show for the ball to feet rather than going in behind so they can receive the ball and run forward towards the defence, the MEZ if the ball goes towards the wingers will push between the lines between the CB and FB to receive the ball from the winger in a wider position. If the ball is secured in the CM area the MEZ and AP will play shorter before working the ball wide and the AP has licence to play all range of passes where as the MEZ have only short passes available which is ok because they are targeted to run with the ball not move it through passing, the ball typically will work its way wide where the most space is which leads to the attacking phase of play.
When Attacking in the opposition final 3rd the team will swarm around the 18 yard box looking for small pockets of space to get in behind this will look the most similar to how Ajax under Ten Haag operate with short passes at a high pace to move and disrupt a defensive line, if this isn’t possible then the ball will work its way wide where the winger and the MEZ on the side with the ball with work together to get the ball in the box, whereas the MEZ and winger on the opposite side will force entry into the box which will force the AF towards the near post with the MEZ occupying the centre of the box and the opposite winger on the far post, at this point the AP will be on the edge of the box with the FB sat narrow in the centre of the final third to mop up shorter clearances and the CB on the half way line to challenge the ball if it is cleared long, the Winger on the same side of the MEZ will show for the ball on the corner of the 18 yard box for a cut back from the MEZ and vice versa if the winger is on the ball for them to put an angled ball into the box, if this option is cut off then then MEZ/Winger will look to put the ball into the box with 3 or 4 players in the box ready to pounce.
When transitioning from ATT to DEF the first thing the team will do is isolate who has the ball, the team will swarm the player on the ball cutting off short passing lanes starting with the AF closely followed by the MEZ and finally the AP covering off all short options, the wingers will press the ball if out wide but if centrally they will push towards the FB if ball towards that side and the opposite side winger will sit narrower alongside the 3CM moving towards the ball. This forces the opposition to try and play through the press which is risky at best but more likely they will go back to the keeper and the reset their shape which gives us time to shape up our 2nd press if the keeper goes short, if they don’t go backwards and punt it longer or switch to the other flank then the CB and opposite FB and winger are all ready to pounce on the ball and intercept to start our own counter, the CB are prepared to follow a runner into the channel if the ball is played over the FB and their job is to slow the attacker down so the CM and wingers can drop back in to cut off the passing lanes back towards his support.
2. Team / Player Instructions
Now we will look at the team and player instructions, I will merge them together as the player instructions are only there to compliment the overall team instructions and just to fine tune what we expect the players to do within the overall instructions given.
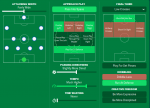
The mentality is set to attacking to support the pace in which we pass and move and press
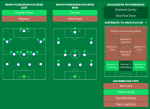
In possession –

We are looking to run at the defence whilst also being given the option to pass into space when the opportunity arises, running at defence allows the team to have more pressure to carry the ball whilst looking for passing or shooting, this is great for the MEZ and Wingers who are going to carry the ball into attacking areas with the option pass/shoot/cross, the AP will also carry the ball forwards but with their individual instruction to play direct passes they will more often than not play a pass rather than take players through dribbling. The FB will carry the ball and this isn’t restricted to just coming inside as IWB typically will only look to come inside but if the space is on the overlap then they will go on the outside before looking to cut the ball back to the MEZ/Winger before dropping back into the CM position to secure the threat of the counter. All crosses are told to go in low but that isn’t always the case, majority of the time they will flash the ball across the box but if crossing from a deeper position then they will drill the ball in at pace in the air, on the occasion the MEZ/Winger/IWB will see the opposite winger/MEZ drift towards the back post and have space so they will look to play the ball to them, this I don’t count as a cross as its more of a through ball pass over the defence for them to hammer home at the back post. With the much higher tempo and work ball into the box this creates a pinball effect around the 18 yard area where players will look to break the back line and come back and move frantically for small pockets of space to pass the ball into and then bounce the ball back and forth looking for a through ball to get the shot away and leads to some beautiful looking goals where the defenders look like they have just had enough with just chasing shadows and a player pops up in the box with a goal. As ive said already that the IWB will on occasion go on the overlap, this is down to the instruction to overlap set on, this also helps when looking for through balls as the team will remain patient in the final 3rd to look to play one of the wider players in such as the Winger coming in or the MEZ if they have swapped over, the overlap also helps with the wingers starting positioning and their initial movement both with and without the ball, in the first instance they will look to receive the ball in the pocket between the FB and winger and CM before attacking on the outside of the FB, if the FB is already in a wider starting position then they will dribble inside which will then allow the MEZ/IWB to go round the outside which always creates overloads in the wide attacking areas with 2-4 players in those zones and only 1 -3 opposition players to defend with the FB and Winger and if playing against 3CB formations the wide CB will come over on occasion, the opposition CM usually wont come out to help this due to the opposite MEZ and AP making their way towards the box meaning we can play the ball around in those areas looking for the ball into the box.
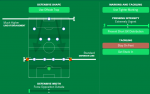
In Transition –

This one is quite simple, keeper instructed to throw it long to the FB, this seems counter intuitive but if the FB come inside due to being IWB then they will still throw it long but the target changes to the Wingers which leads to counters, from goal kicks they will play out from the back as per the in possession instruction and this then allows the team to move around for space to receive the ball like I described the before with the AP and wingers coming towards the ball to help the MEZ and AF will look to break lines through CM and CB, the IWB will come inside to cover the space that the MEZ have left creating a glorious “V” shape from GK to CB to IWB to Wingers with the AP sat in the middle of it all, if the ball goes short the MEZ closest to the ball will turn around for the short option while the opposite MEZ will push on towards the back line to support the AF who will have drifted into the channel between CB and FB on the same side where the ball is almost creating a 442 look to it, the opposite Winger will drift inside to help support the space that the MEZ has left behind if the switch is on he can pick the ball up and run at the then isolated FB who will have the MEZ next to him and the winger running at him with the ball.
Out of possession –

With the block of 3 in CM the idea is to force the players outside through intense pressing and leaving the only space available on the outside, this isn’t much as the winger drops in and supports the FB so we will never have a negative overload in the wide areas, the 3 CM will shuffle in tandem across to the side of where the ball is if it goes wide to cut off the short passing lanes leaving their players with the ball with little options. The defensive line is set to standard, this alongside playing wider and the higher line of engagement means that the CB will challenge for the ball both in central and in the channels rather than dropping off which keeps the pressure on the ball after the press has forced the ball long, preventing short keeper distribution is on to make sure that the keeper doesn’t have time to play the ball short and will be encouraged to play the ball long to make sure that we can attempt to make an interception or win the clearance to retain possession with the positioning of the IWB and the CB. Get stuck in is a personal preference but its one that over the course of a season will make a big difference, what I mean by this is that the odds of winning the ball back is significantly higher with this set on and as long as the game is managed correctly i.e. taking CMs off when on a yellow to prevent a red, this will increase turn overs and allow for counters and more goals as a result, don’t get me wrong there will be the odd red card in a game that cant be controlled but I have a fix for this which I will cover off later in the MISC section, the main aim is to be so far out of sight in a game that even if a red card comes the opposition wont be able to make up the difference, furthermore the team performs just as well with the tweak to the tactic if a red comes as the formation turns into a 424 with one of the MEZ taken off (usually if a red comes its from a winger or MEZ having a silly moment). Using tighter marking means that the players will always attempt to be close to opposition players making it very difficult for players to receive the ball and this works well with the higher pressing lines, finally is the offside trap, again this is preference but over the course of a season will help more than hinder as it sets the mentality of the defenders to engage forward towards the ball rather than dropping in and playing for the offside works in tandem with this.
4. Player roles / attributes
Now I will cover off what each individual position does in regards to the team and what I consider are the best attributes for the role based on if I were a prem side… for the attributes I would prefer the player to be well rounded and have 13-14 on all of the key atts rather than 15-16 on some and 10 on others, this is preference but overall the players will get better average ratings if they have a complete game, side note if I can I prefer all my players to be over 6ft tall and be physically better rather than technically proficient as the more ground a player can cover the more opportunities they will have to win the ball in both phases of play even if their success rate is less, overall this in my opinion and its based from NFL theories where individual match ups and
misdirection are key victory.
So I will now give my OPINION on what I look for in each role based on what I need the player to do in their role and as part of the team tactical… giving the key attributes that I look for in each player
## I only look for between 5-6 key attributes but will decide to pick a player based on the overall attribute picture…
#### the key attributes are the bare minimum that I require and the level needed will change depending on the league your playing in but in England I separate this into broad spectrums
Europe prem – 14 -16
prem – 12-15
Championship – 11 – 14
League 1 – 10 – 13
League 2 – 9 – 12
the reason for the broad ranges for each is due to the fact that I prefer to have a player in the top prem for example to have all 6 or 7 key attributes at 13 rather than 4 at 15 or 16 and the other 2 at 10 as I view that all the KEY atts to be as important as all the others and missing 1 or 2 for the level that your at can have a detrimental effect on the overall performance of that player and due to the fluidity of the team it will have a domino effect causing the team to suffer as a result
GK – pretty standard stuff here, just needs to keep the ball from going in the back of the net, you will see a common theme throughout the list here that prefer taller players (over 190cm or 6ft2)
Key att – reflexes, one-on-ones, positioning, jumping, agility, balance (low eccentricity)
CB – Pace and power and generally being dominant physically is the order of the day here, they need to be strong in the air and need to be quick enough to cover vast ground as they are expected to play an aggressively high line.
Key att – acceleration, jumping, tackling, marking, positioning, concentration, decisions.
IWB – These guys will cover a lot of ground constantly so will need great engines, they need to be predominantly defesinvely minded with the ability to keep control of the ball and due to being inverted they will almost act like a DLP or defensive midfielder to need to be technically proficient, well rounded but with a preference on physical attributes size and pace.
Key att – acceleration, stamina, work rate, tackling, passing, first touch, positioning, OTB
AP – as I explained above this position is my favourite in the tactic as they give so much in all phases of the play but mainly getting the team ticking especially when dealing with a low block he will find time and space all the time to create moves and creating time for others to free up and find space that he can then exploit, the style of player for me is more in line with what you would look for in DLP so needs to be defensively proficient as well as having the ability to play all range of passes. As I explained this player is going to cover more area than any other player and be constantly on the move being available for a pass so a good engine is a must. This is one position that I would sacrifice physical size to get the right ATTS
Key att – Acceleration, stamina, work rate, passing, first touch, vision, team work, decisions, off the ball.
MEZ – the physical enforcers driving through teams, these need the ability to get past players both with and without the ball, need to out muscle and out speed the other CMs they will encounter to give them an advantage, they will cover similar distances as the wingers and need to be up and down all day, they engage the press and will on occasion higher up than the wingers and the AF and can be frequently seen in 1-on-1 situations in games where the counter is involved.
Key att – acceleration, stamina, work rate, off the ball, first touch, dribbling, anticipation, crossing/finishing/passing (not required but will help in some scenarios)
W – these guys will be up and down the flanks all day so need to cover ground quickly, being rapid and able to beat a man physically is essential, they will get into great positions to cross throughout the game so need the technique to do this but in a smart way as they will be looking to pick a player out rather than just standing a ball up.
Key att – acceleration, Pace, off the ball, first touch, dribbling, crossing, vision, flair, passing
AF – the spearhead of the attack and the player most likely to be on the end of moves rather than creating them, I prefer a stronger physical presence so taller stronger and quicker to compete and have an advantage over most defences in 1 way or another, then focus on how they move and read the game to create space for themselves or others, finally to concentrate on their ability to finish off moves and be able to receive the ball in tight spaces to fashion out shots.
Key att – Acceleration, jumping, strength, off the ball, anticipation, composure, finishing, heading and first touch.
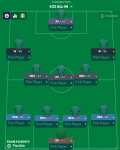
below is my best XI for the season and you can see the average rating is high for all positions even though some of the roles aren't actively effecting the game as much as others shows that the team will contribute to the game in equal measures.

5. Stats and results
So now we will take a look at the results, stats and key players within my Hertha save which is at the end of the 2025/2026 season. We have won the league and cup double for the past 2 years with an slightly above average side but nowhere near the strength of Bayern or Dortmund and would be in direct competition with RB Leipzig for Europe or so I thought, this tactic has elevated us to heights that I couldn’t have even imagined, the main reason I wanted to share this tactic with you is the fact that on top of changing the guard in Germany I have also won the champions league for 2 years straight and it was comfortable as you will see with the final result against Valencia!!!!
Bundesliga:
As you can see the league table ended with an unbeaten season, I was unhappy however as there were 3 or 4 draws towards the end of the season which were entirely avoidable but due to FM and its love for a CL hangover and with the next games being CL quarter and semi finals team were apparently distracted (also the fact that the team was fully rotated lol). The goal difference is the most impressive for me as I have nearly double the amount over Bayern and as you can see at the results there are a lot of dominant wins over teams ranging from teams newly promoted and teams at the top which shows that the tactic is versatile in breaking down all types of teams.


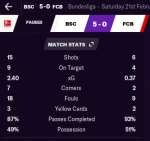
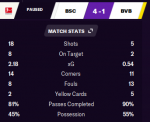
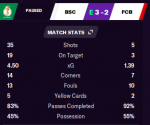
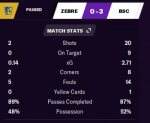
Highlight – main highlights from the Bundesliga come from the games against Bayern and Dortmund, as you can see the stats of these games are almost identical, the tactic creates on average 2 to 3x more XG than the opposition and even more against weaker sides and this was evident against both of the big boys in Germany, they didn’t have an answer for the swarming nature of the tactic both offensively or defensively as we created a lot of good chances and reduced them very little throughout the games.


Pokal, Club world championship + Super Cup:
The Pokal in Germany is all dependant on if you can avoid Bayern or Dortmund to get to the final like playing a game of minesweeper, I hit Bayern in the semi and missed Dortmund altogether with a very easy final opposition in Koln, ill show you the stats from another domination against Bayern as a carbon copy of the league result from this…


the Super Cup and the club world championship were essentially warm up matches to get match sharpness into the boys but the tactic really doesn’t need it, we wiped the floor everyone in the CWC and won it quite easily and the super cup was the 1st of 2 occasions of facing Valencia in a final and both were easy but more on that when we cover the champions league
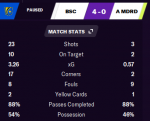
Highlight – as you can see the similarities on the match stats to the games in the bundesliga show how consistent the tactic is against some of the biggest sides in Europe, even when playing against the “weaker” sides the results just escalate to higher levels.


The Champions League:
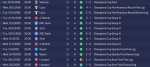
The champions league started strong and got better and better with some dominant displays in the group against Atletico to smashing past Lazio and Napoli, the games against Liverpool were tighter than I would have liked but the game should have been put to bed in the first leg but conceded 2 sloppy goals and should have had at least 1 more but didn’t finish our dinner. The GD in the group was outstanding with a +28 GD so on average got 4.7 goals per game which is just broken.

Highlights – other than the GD in the group stage the highlight has to be the final against Valencia, as it was the last game of the season I can even show the graph for the XG for the game and see how many chances throughout the game were presented, the team were fantastic in this game, clinical and dominant from the first minute to the last and from watching the game could have had even more goals!!!!


6. MISC
Here I will go through any random things that usually get asked around what I do for training for if there is a red card etc so I can cover it all off and hopefully answer any questions you might have, or catch out the people that don’t read it all and ask the questions anyway lol…
7. OUTRO
So there we have it… 6000 words later… that’s over half a dissertation at UNI… thank you for reading to the end if you got here if you died half way through then I apologise but also assume no responsibility as it was your choice. I hope you all have fun with this tactic and let me know in the comments how your getting on with it with some screenshots as a testimonial to the tactic or any tweaks you might have made…
433 ALL-IN.fmf
So I’ve been away for a while and not posted a tactic for a good year now and I’m back to have a stab at getting the top spot on the leader board for the BEST TACTIC on FM21… it’s a bold claim but ive created something which is scary good and makes some of my previous tactics look mediocre at best. As a SPURS fan I decided when Mourinho was sacked (thank god) to create a tactic that emulated how I wanted spurs to play and with the most prominent choice coming up being Ten Haag I wanted to try and use some of his philosophies around movement and short passing into the tactic and the results will speak for themselves.
in this write up I will cover off how the tactic works fundamentally and how that performs within the match engine, included in this part will be what I look for in each individual role and my preference of player with key attributes listed for each position. I will show you some highlight results along with the league table and champions league on my save with Hertha Berlin where I have just won the CL for the second time in succession and along with the DFB-Pokal cup and Bundesliga both for the second time. I will show all results from the season and see some of the scoring exploits of the team showing some of the top performers showing that the team isn’t world class in any way shape or form and that the tactic has elevated the team to heights that even I didn’t think was possible. Finally I will cover off any miscellaneous items such as training and opp instructions and what to do if down to 10 men etc.
This tactic is plug and play and is quite a typical shape so most teams can put in a team and get success, anyone familiar with my previous work this will be lengthy and detailed write up so strap yourselves in for that, if you would prefer to try it without the write up then go ahead you wont be disappointed and refer back to this if you run into any problems… I look forward to see and hear how your getting on if you use the tactic and am excited to see how high up the tactic testing league this can get.
433 ALL-IN.fmf
OK with that out of the way let’s get into it shall we.
Contents:
- The tactic
-
- Team / Player Instructions
- Player roles / attributes
- Stats and results
- MISC
- Outro
- Team / Player Instructions
1. The Tactic
As I explained before this tactic was inspired by the sacking of the spurs boss and how I envisage how football should be played but a caveat to that is that the most likely incoming manager at the time was Ten Haag and his footballing philosophy intrigued me so I tried to incorporate some of his methodology into the tactic especially how the short passing and intense movement to create chances and also the intense press when in transition to force the turn over to regain possession higher up the pitch by outnumbering the opposition player on the ball to force the ball long or backwards at all costs.
The Advanced Playmaker in CM is my pride and joy in this tactic, he is my Patrick Mahomes, he will just roam around the entire pitch keeping up with play and have the freedom to make all sorts of passes from short intricate passing exchanges to long switch balls to the flanks, always looking to do damage to the opposition, however WHY I like this so much is the fact that the supporting players around him are looking to get further forward so the AP will more often than not find himself the furthest back CM and will only be forces up the field by the IWB coming up behind him leading to him being on the edge of the 18 yard box for a cut back, I started out with a DLP on defend but he would get lost in deeper positions and not have an influence on the game, even on support he would start far too deep and not be able to keep up with play, when I changed to an AP on support he would start higher and the average ratings would improve but he would be too concerned with the space left behind and wouldn’t get to the desired attacking position on the edge of the box, so I went the other way and put on attack with get further forward similar to the MEZ and this didn’t work as he wouldn’t show for the shorter balls on the defensive phase when building up from the back but when I took off get further forward everything clicked, he would show the ball in EVERY phase of the play and be the top of a triangle with the CB and when attacking with the IWB, but also be the bottom of the triangle with the attacking MEZ on either side and the bottom of a diamond with the AF being the spearhead. I watched some of the games on full match and highlighted JOSE (my AP at the time, ill show you him later) and he was everywhere linking everything, didn’t get assists in the game but he was the pass before the assist multiple times and without the AP doing this it would not be nearly as effective however the AP in a quick counter and when the MEZ has the ball they can carry rather than give off to the AP but worry not he was always there for the pass to help if required.
Defensively this tactic shapes up as a quite basic 433 with the wide players dropping in to cover off the overlap and the 3 CM all engage in high press and don’t allow the ball to be in the centre of the park for any time at all thus forcing the opponents wide where the wingers and FB are ready to pounce and steal the ball for a counter, if the opposition gets the ball in a wide area then they will met with a winger pressing the FB and our FB pressing the ball if its in our final 3rd but typically it would go to a FB which is our winger pressing, the 3CM will close up behind this to cut off the short passing lanes forcing the person in possession to go backwards to the keeper or try a risky ball into the centre or a cross field ball to the other wing where tour winger and FB are ready to intercept
In transition from DEF to ATT the team will move very quickly to make space for passes and/or through balls, this is done by the AP moving towards the player on the ball for a shorter option and the MEZ push beyond the opposition CM to receive the ball on the run, the wingers on support will show for the ball to feet rather than going in behind so they can receive the ball and run forward towards the defence, the MEZ if the ball goes towards the wingers will push between the lines between the CB and FB to receive the ball from the winger in a wider position. If the ball is secured in the CM area the MEZ and AP will play shorter before working the ball wide and the AP has licence to play all range of passes where as the MEZ have only short passes available which is ok because they are targeted to run with the ball not move it through passing, the ball typically will work its way wide where the most space is which leads to the attacking phase of play.
When Attacking in the opposition final 3rd the team will swarm around the 18 yard box looking for small pockets of space to get in behind this will look the most similar to how Ajax under Ten Haag operate with short passes at a high pace to move and disrupt a defensive line, if this isn’t possible then the ball will work its way wide where the winger and the MEZ on the side with the ball with work together to get the ball in the box, whereas the MEZ and winger on the opposite side will force entry into the box which will force the AF towards the near post with the MEZ occupying the centre of the box and the opposite winger on the far post, at this point the AP will be on the edge of the box with the FB sat narrow in the centre of the final third to mop up shorter clearances and the CB on the half way line to challenge the ball if it is cleared long, the Winger on the same side of the MEZ will show for the ball on the corner of the 18 yard box for a cut back from the MEZ and vice versa if the winger is on the ball for them to put an angled ball into the box, if this option is cut off then then MEZ/Winger will look to put the ball into the box with 3 or 4 players in the box ready to pounce.
When transitioning from ATT to DEF the first thing the team will do is isolate who has the ball, the team will swarm the player on the ball cutting off short passing lanes starting with the AF closely followed by the MEZ and finally the AP covering off all short options, the wingers will press the ball if out wide but if centrally they will push towards the FB if ball towards that side and the opposite side winger will sit narrower alongside the 3CM moving towards the ball. This forces the opposition to try and play through the press which is risky at best but more likely they will go back to the keeper and the reset their shape which gives us time to shape up our 2nd press if the keeper goes short, if they don’t go backwards and punt it longer or switch to the other flank then the CB and opposite FB and winger are all ready to pounce on the ball and intercept to start our own counter, the CB are prepared to follow a runner into the channel if the ball is played over the FB and their job is to slow the attacker down so the CM and wingers can drop back in to cut off the passing lanes back towards his support.
2. Team / Player Instructions
Now we will look at the team and player instructions, I will merge them together as the player instructions are only there to compliment the overall team instructions and just to fine tune what we expect the players to do within the overall instructions given.
The mentality is set to attacking to support the pace in which we pass and move and press
In possession –
We are looking to run at the defence whilst also being given the option to pass into space when the opportunity arises, running at defence allows the team to have more pressure to carry the ball whilst looking for passing or shooting, this is great for the MEZ and Wingers who are going to carry the ball into attacking areas with the option pass/shoot/cross, the AP will also carry the ball forwards but with their individual instruction to play direct passes they will more often than not play a pass rather than take players through dribbling. The FB will carry the ball and this isn’t restricted to just coming inside as IWB typically will only look to come inside but if the space is on the overlap then they will go on the outside before looking to cut the ball back to the MEZ/Winger before dropping back into the CM position to secure the threat of the counter. All crosses are told to go in low but that isn’t always the case, majority of the time they will flash the ball across the box but if crossing from a deeper position then they will drill the ball in at pace in the air, on the occasion the MEZ/Winger/IWB will see the opposite winger/MEZ drift towards the back post and have space so they will look to play the ball to them, this I don’t count as a cross as its more of a through ball pass over the defence for them to hammer home at the back post. With the much higher tempo and work ball into the box this creates a pinball effect around the 18 yard area where players will look to break the back line and come back and move frantically for small pockets of space to pass the ball into and then bounce the ball back and forth looking for a through ball to get the shot away and leads to some beautiful looking goals where the defenders look like they have just had enough with just chasing shadows and a player pops up in the box with a goal. As ive said already that the IWB will on occasion go on the overlap, this is down to the instruction to overlap set on, this also helps when looking for through balls as the team will remain patient in the final 3rd to look to play one of the wider players in such as the Winger coming in or the MEZ if they have swapped over, the overlap also helps with the wingers starting positioning and their initial movement both with and without the ball, in the first instance they will look to receive the ball in the pocket between the FB and winger and CM before attacking on the outside of the FB, if the FB is already in a wider starting position then they will dribble inside which will then allow the MEZ/IWB to go round the outside which always creates overloads in the wide attacking areas with 2-4 players in those zones and only 1 -3 opposition players to defend with the FB and Winger and if playing against 3CB formations the wide CB will come over on occasion, the opposition CM usually wont come out to help this due to the opposite MEZ and AP making their way towards the box meaning we can play the ball around in those areas looking for the ball into the box.
In Transition –
This one is quite simple, keeper instructed to throw it long to the FB, this seems counter intuitive but if the FB come inside due to being IWB then they will still throw it long but the target changes to the Wingers which leads to counters, from goal kicks they will play out from the back as per the in possession instruction and this then allows the team to move around for space to receive the ball like I described the before with the AP and wingers coming towards the ball to help the MEZ and AF will look to break lines through CM and CB, the IWB will come inside to cover the space that the MEZ have left creating a glorious “V” shape from GK to CB to IWB to Wingers with the AP sat in the middle of it all, if the ball goes short the MEZ closest to the ball will turn around for the short option while the opposite MEZ will push on towards the back line to support the AF who will have drifted into the channel between CB and FB on the same side where the ball is almost creating a 442 look to it, the opposite Winger will drift inside to help support the space that the MEZ has left behind if the switch is on he can pick the ball up and run at the then isolated FB who will have the MEZ next to him and the winger running at him with the ball.
Out of possession –
With the block of 3 in CM the idea is to force the players outside through intense pressing and leaving the only space available on the outside, this isn’t much as the winger drops in and supports the FB so we will never have a negative overload in the wide areas, the 3 CM will shuffle in tandem across to the side of where the ball is if it goes wide to cut off the short passing lanes leaving their players with the ball with little options. The defensive line is set to standard, this alongside playing wider and the higher line of engagement means that the CB will challenge for the ball both in central and in the channels rather than dropping off which keeps the pressure on the ball after the press has forced the ball long, preventing short keeper distribution is on to make sure that the keeper doesn’t have time to play the ball short and will be encouraged to play the ball long to make sure that we can attempt to make an interception or win the clearance to retain possession with the positioning of the IWB and the CB. Get stuck in is a personal preference but its one that over the course of a season will make a big difference, what I mean by this is that the odds of winning the ball back is significantly higher with this set on and as long as the game is managed correctly i.e. taking CMs off when on a yellow to prevent a red, this will increase turn overs and allow for counters and more goals as a result, don’t get me wrong there will be the odd red card in a game that cant be controlled but I have a fix for this which I will cover off later in the MISC section, the main aim is to be so far out of sight in a game that even if a red card comes the opposition wont be able to make up the difference, furthermore the team performs just as well with the tweak to the tactic if a red comes as the formation turns into a 424 with one of the MEZ taken off (usually if a red comes its from a winger or MEZ having a silly moment). Using tighter marking means that the players will always attempt to be close to opposition players making it very difficult for players to receive the ball and this works well with the higher pressing lines, finally is the offside trap, again this is preference but over the course of a season will help more than hinder as it sets the mentality of the defenders to engage forward towards the ball rather than dropping in and playing for the offside works in tandem with this.
4. Player roles / attributes
Now I will cover off what each individual position does in regards to the team and what I consider are the best attributes for the role based on if I were a prem side… for the attributes I would prefer the player to be well rounded and have 13-14 on all of the key atts rather than 15-16 on some and 10 on others, this is preference but overall the players will get better average ratings if they have a complete game, side note if I can I prefer all my players to be over 6ft tall and be physically better rather than technically proficient as the more ground a player can cover the more opportunities they will have to win the ball in both phases of play even if their success rate is less, overall this in my opinion and its based from NFL theories where individual match ups and
misdirection are key victory.
So I will now give my OPINION on what I look for in each role based on what I need the player to do in their role and as part of the team tactical… giving the key attributes that I look for in each player
## I only look for between 5-6 key attributes but will decide to pick a player based on the overall attribute picture…
#### the key attributes are the bare minimum that I require and the level needed will change depending on the league your playing in but in England I separate this into broad spectrums
Europe prem – 14 -16
prem – 12-15
Championship – 11 – 14
League 1 – 10 – 13
League 2 – 9 – 12
the reason for the broad ranges for each is due to the fact that I prefer to have a player in the top prem for example to have all 6 or 7 key attributes at 13 rather than 4 at 15 or 16 and the other 2 at 10 as I view that all the KEY atts to be as important as all the others and missing 1 or 2 for the level that your at can have a detrimental effect on the overall performance of that player and due to the fluidity of the team it will have a domino effect causing the team to suffer as a result
GK – pretty standard stuff here, just needs to keep the ball from going in the back of the net, you will see a common theme throughout the list here that prefer taller players (over 190cm or 6ft2)
Key att – reflexes, one-on-ones, positioning, jumping, agility, balance (low eccentricity)
CB – Pace and power and generally being dominant physically is the order of the day here, they need to be strong in the air and need to be quick enough to cover vast ground as they are expected to play an aggressively high line.
Key att – acceleration, jumping, tackling, marking, positioning, concentration, decisions.
IWB – These guys will cover a lot of ground constantly so will need great engines, they need to be predominantly defesinvely minded with the ability to keep control of the ball and due to being inverted they will almost act like a DLP or defensive midfielder to need to be technically proficient, well rounded but with a preference on physical attributes size and pace.
Key att – acceleration, stamina, work rate, tackling, passing, first touch, positioning, OTB
AP – as I explained above this position is my favourite in the tactic as they give so much in all phases of the play but mainly getting the team ticking especially when dealing with a low block he will find time and space all the time to create moves and creating time for others to free up and find space that he can then exploit, the style of player for me is more in line with what you would look for in DLP so needs to be defensively proficient as well as having the ability to play all range of passes. As I explained this player is going to cover more area than any other player and be constantly on the move being available for a pass so a good engine is a must. This is one position that I would sacrifice physical size to get the right ATTS
Key att – Acceleration, stamina, work rate, passing, first touch, vision, team work, decisions, off the ball.
MEZ – the physical enforcers driving through teams, these need the ability to get past players both with and without the ball, need to out muscle and out speed the other CMs they will encounter to give them an advantage, they will cover similar distances as the wingers and need to be up and down all day, they engage the press and will on occasion higher up than the wingers and the AF and can be frequently seen in 1-on-1 situations in games where the counter is involved.
Key att – acceleration, stamina, work rate, off the ball, first touch, dribbling, anticipation, crossing/finishing/passing (not required but will help in some scenarios)
W – these guys will be up and down the flanks all day so need to cover ground quickly, being rapid and able to beat a man physically is essential, they will get into great positions to cross throughout the game so need the technique to do this but in a smart way as they will be looking to pick a player out rather than just standing a ball up.
Key att – acceleration, Pace, off the ball, first touch, dribbling, crossing, vision, flair, passing
AF – the spearhead of the attack and the player most likely to be on the end of moves rather than creating them, I prefer a stronger physical presence so taller stronger and quicker to compete and have an advantage over most defences in 1 way or another, then focus on how they move and read the game to create space for themselves or others, finally to concentrate on their ability to finish off moves and be able to receive the ball in tight spaces to fashion out shots.
Key att – Acceleration, jumping, strength, off the ball, anticipation, composure, finishing, heading and first touch.
below is my best XI for the season and you can see the average rating is high for all positions even though some of the roles aren't actively effecting the game as much as others shows that the team will contribute to the game in equal measures.
5. Stats and results
So now we will take a look at the results, stats and key players within my Hertha save which is at the end of the 2025/2026 season. We have won the league and cup double for the past 2 years with an slightly above average side but nowhere near the strength of Bayern or Dortmund and would be in direct competition with RB Leipzig for Europe or so I thought, this tactic has elevated us to heights that I couldn’t have even imagined, the main reason I wanted to share this tactic with you is the fact that on top of changing the guard in Germany I have also won the champions league for 2 years straight and it was comfortable as you will see with the final result against Valencia!!!!
Bundesliga:
As you can see the league table ended with an unbeaten season, I was unhappy however as there were 3 or 4 draws towards the end of the season which were entirely avoidable but due to FM and its love for a CL hangover and with the next games being CL quarter and semi finals team were apparently distracted (also the fact that the team was fully rotated lol). The goal difference is the most impressive for me as I have nearly double the amount over Bayern and as you can see at the results there are a lot of dominant wins over teams ranging from teams newly promoted and teams at the top which shows that the tactic is versatile in breaking down all types of teams.
Highlight – main highlights from the Bundesliga come from the games against Bayern and Dortmund, as you can see the stats of these games are almost identical, the tactic creates on average 2 to 3x more XG than the opposition and even more against weaker sides and this was evident against both of the big boys in Germany, they didn’t have an answer for the swarming nature of the tactic both offensively or defensively as we created a lot of good chances and reduced them very little throughout the games.
Pokal, Club world championship + Super Cup:
The Pokal in Germany is all dependant on if you can avoid Bayern or Dortmund to get to the final like playing a game of minesweeper, I hit Bayern in the semi and missed Dortmund altogether with a very easy final opposition in Koln, ill show you the stats from another domination against Bayern as a carbon copy of the league result from this…
the Super Cup and the club world championship were essentially warm up matches to get match sharpness into the boys but the tactic really doesn’t need it, we wiped the floor everyone in the CWC and won it quite easily and the super cup was the 1st of 2 occasions of facing Valencia in a final and both were easy but more on that when we cover the champions league
Highlight – as you can see the similarities on the match stats to the games in the bundesliga show how consistent the tactic is against some of the biggest sides in Europe, even when playing against the “weaker” sides the results just escalate to higher levels.
The Champions League:
The champions league started strong and got better and better with some dominant displays in the group against Atletico to smashing past Lazio and Napoli, the games against Liverpool were tighter than I would have liked but the game should have been put to bed in the first leg but conceded 2 sloppy goals and should have had at least 1 more but didn’t finish our dinner. The GD in the group was outstanding with a +28 GD so on average got 4.7 goals per game which is just broken.
Highlights – other than the GD in the group stage the highlight has to be the final against Valencia, as it was the last game of the season I can even show the graph for the XG for the game and see how many chances throughout the game were presented, the team were fantastic in this game, clinical and dominant from the first minute to the last and from watching the game could have had even more goals!!!!
6. MISC
Here I will go through any random things that usually get asked around what I do for training for if there is a red card etc so I can cover it all off and hopefully answer any questions you might have, or catch out the people that don’t read it all and ask the questions anyway lol…
- RED CARD – if a player is sent of take one of the MEZ off and move the AP over to make a 2 man midfield consisting of an AP and a MEZ both on attack, no need to change anything else.
-
- Wingers should match the side they are on so left winger should be left footed and vice versa
- The IWB don’t need to be opposite footed as its more about their positioning and movement rather than having the correct foot so having right foot on RB is fine.
- Training – general: I leave all general training to my TL but add in “match review” manually after every game as the UI doesn’t do it
- Training – individual – I set each player to train in the role they are going to play in so all CB on BPD, all FB on IWB on support, all CM to train as a MEZ on support, the wingers should be trained as wingers if not natural but if they are then train the opposite wing with inside forward so our right winger should be trained as an IF on support on the left wing. any CAM should be converted to CM so train as MEZ on support and ST training should be a DLF on attack with focus on quickness, if they have passing ability then I train them as a CAM as a SS as this will increase their value if needed to be sold in the future.
from there I select the weakest area from their stats to focus attention on… typically for CB is quickness or final 3rd (decisions and anticipation) for WB its usually ball control, for CM I focus on either ball control or endurance depending on traits. Wingers will usually focus on shooting as this is typically low for them but could look at attacking movement if not proficient. As for the ST usually focus on quickness but if they are physically good enough then will focus on attacking movement or passing.
Finally I will put the entire team through player trait training to help their role… for CB simple passes, don’t argue, etc… IWB to look for pass and develop long bullet throw… MEZ get forward whenever possible, dribble with the ball through middle, play 1-2’s shoot with power… AP dictate play, switch ball to the other flank, look for killer ball, pass rather than shoot tries killer balls… Wingers to dribble down their flank, knock ball past opponent, killer balls, dribble more. ST will be more focused around movement so beating offside trap, shorter passes hold up ball etc.
- Opposition instructions – don’t have any and don’t let anyone do them… I have the team on individual instructions to press in the way that I want the team to do it.
- Pitch size – the results are based on the average standard size for pitches haven’t tried with anything else… but I would have thought the bigger the pitch the better
- Subs – rotate the 2x MEZ at 60 mins as they get through the most work then look to take of either the AP or one of the wingers depending if they have a card, if they don’t then look to make off the player who is having the worse game typically will be one of the wingers.
- If defending a lead with 10-15 to go… set to lower tempo and time wasting to full and set play for set pieces on, take off counter press and drop D line to higher rather than much higher.
- If needing a goal in the last 10-15 then push the AP in the CAM slot and change the wingers to attack, change MEZ to support and change IWB to WB on attack.
- Set piece takers – I usually just hit quick pick but if I had to select them manually to set up the right takers then make sure that the right winger is taking left corners and left winger is taking right corners, best free kick taker on free kicks and the LB on left throws and right throws…
- Set piece instruction – all have a very basic set up, all corners are set to near post delivery with the CBs around the near post to attack with the AF attacking the back post for a the flick on if its presented – nothing special, free kicks, put the ball in to the big men running in – nothing special. Throw-ins – both set to long with the AF at the near post, nothing special but just puts the ball in the mix. The tactic should include the set pieces in the download and can create 10-15 goals a season on average.
- As for PENS, due to the wingers running into the box and a lot of passes in and around the 18 yard box there will be a fair number of PENS over the season so make sure you have the right pen taker on these… typically will be obvious but I usually prefer my AF to take them.
- Wingers should match the side they are on so left winger should be left footed and vice versa
7. OUTRO
So there we have it… 6000 words later… that’s over half a dissertation at UNI… thank you for reading to the end if you got here if you died half way through then I apologise but also assume no responsibility as it was your choice. I hope you all have fun with this tactic and let me know in the comments how your getting on with it with some screenshots as a testimonial to the tactic or any tweaks you might have made…
433 ALL-IN.fmf
-
 433 ALL-IN - tactic.PNG
 -
 A.Jose.PNG
 -
 Best XI.PNG
 -
 Bund vs Bayern.PNG
 -
 BundVs Dortmand.PNG
 -
 CL fina vs valencia.png
 -
 CL vs atletico.PNG
 -
 I.dukic.PNG
 -
 In possession.PNG
 -
 In Transition.PNG
 -
 League Table.png
 -
 Out of Possession.PNG
 -
 Pokal SF vs Bayern.PNG
 -
 Results - Bundesliga.png
 -
 Results - Champions League.PNG
 -
 results - Club world championship.PNG
 -
 Results - Pokal + Super Cup.PNG
 -
 Super Cup Final Vs Juventus.PNG
 -
 the TDOG.PNG