When you create tactics in Football Manager you usually end up following one of two paths; you can either create an outline of a tactical style and try to recreate that specific style in FM, or you can go on a mission to discover what happens when you try certain things.
In the past, I have always been a gamer who has a well-defined plan in mind and started tinkering with those ideas as a sort of end-goal I wished to achieve. Gungnir is different, for me anyway.
Instead of having a precise idea I wanted to use in the game, I started playing and shuffling with players and roles. The road to discovery mostly took place during the Beta phases of the game, where I was messing around with Ajax.
Ajax has an excellent squad for a strikerless enthusiast. Klaas-Jan Huntelaar is their only actual striker, and the array of talent in midfield is mindboggling both in term of their ability and their versatility. The squad also has a few strong left-footed wingers in David Neres and Dusan Tadic, while there are no strong right-footed wingers present.
The basic premise for the Gungnir setup was born out of necessity (and being too lazy to go scouting during Beta). The rest of the tactic built itself around this chaotic conduit I constructed in midfield, generating a fluid, sexy brand of football.

Come on, don't we all love some fluid, sexy football?
The shape
I usually start my tactics building from a 4-1-2-3-0 shape, and this one started (and ended up) similarly. A sweeper keeper, four defenders, one defensive midfielder, two regular midfielders and three players in attacking midfield make up our entire squad.

The concept
This entire team sets up towards misdirection of the opposition. An approach to the game we love to use is the misdirection. Create a conflict for the opposing team between what their players think we are going to do and what we are doing.
In other words, we use a tactical feint to draw a response from the opposing team, which usually creates an opening of some kind for us to exploit.
If we can get the AI to believe our players will behave a certain way while planning a different outcome altogether, we can take advantage of the fact that the defending team has conceded time and space by acting upon our feint. By changing their position and preparing for what they perceive is about to happen, they create a gap that didn't exist initially, while simultaneously limiting their own response time, allowing for team-mates to go on a rampage.

It's usually the IW, Shadow Striker or Mezzala running a rampage.
To make this feint work, we have to apply a third-and-fourth-man principle. Most of the time, the defending team will focus its attention on the player in possession of the ball and the player most likely to receive the ball next. If we can generate extra movement, these additional players can feed off each other's movement, making runs off the ball in anticipation of either receiving the ball from the original ball-carrier or the second man, the primary distraction. If you get this tactical feint right, your additional runners are often unmarked or untracked by a defender.

Either the ball-carrier is allowed space to make a move or he creates space for others.
While the entire concept of a feint starts with the initial positioning of a player, its majestic beauty lies with the movement of the players, or to be more exact, with the shadow runs your players make. Shadow runs are the movements of a player off the ball to drag a defender away from space so that a teammate can then benefit from the opening.
By reacting to such a shadow run while often spotting more movement from the offensive team, the defender has to choose between two evils. He must either: (1) track the run and vacate his position in the defensive line, creating space for others to exploit, or (2) maintain his position in the defensive line, hoping one of his team-mates will pick up the runner. (This assumes, of course, that the defender has seen both runs, and isn't focused solely on the distraction.)
Creating movement is paramount to making this tactic work, to creating the glorious chaos of movement that means there is always someone available to receive the pass.

During an average attack, you often situations like this, with the ball-carrier advancing on the defensive line and there are always four or more passing-options available to him.
By selecting player roles that work well together and feed off each other's movement, you can create that chaos. I admit there was a fair bit of trial and error here, but it starts with plainly knowing how a specific role behaves in the game in conjunction with other roles and on its own. @v_maedhros has written about this very subject before, and I have to admit I intend to edit his posts for FM20 and expand on them for the parts he hasn't covered.
https://strikerless.com/2018/05/16/understanding-roles-in-football-manager-and-real-life-part-1/ - Part I of the understanding roles series.
https://strikerless.com/2018/05/23/understanding-roles-in-football-manager-and-real-life-part-2/ - Part II of the understanding roles series
Reading and observing, tinkering with what I know, this is a chart of the movement the roles I do use tend to generate.

There was heavy tweaking in the player roles since Beta, mostly because certain patches nerfed the game and I needed to adapt. I will look at that later on in this article.
If you want to read more about that midfield setup and why it works the way it does, you ought to read an article I wrote with @seattle-red a few weeks before.

Putting theory to practice
So what does it look like when you put it all into motion?
Video 1
Video 2
Video 3
Video 4
Go on, that looks pretty **** good, doesn’t it?

On a more serious note, the tactic is well-rounded. You would think (and probably rightfully so based on my earlier work) that a tactic built around feints and misdirection would be unstable in terms of its effectiveness. In this case, you would be wrong.

As you can see, fairly well-rounded.
While it is true that we score a lot of goals from through-balls, we score a lot of goals overall and we are doing quite nicely when it comes to crosses and set pieces as well.

Again, well-rounded when you look at the build-up.
We can see similar numbers when we look at where the assists are coming from. The way the tactic is setup offers variation, rather than exploiting a certain loophole. I'm fairly certain that according to popular views, that's a new tune for Strikerless.
The tactical (role) evolution of Gungnir
I'll not bore you with the name of the tactic. I just like my Norse mythology and ran with this name. **** off if you think it's pretentious, I like it.

Just try it. It won't hurt.
Tactical evolution though. The tactic has undergone changes since I started working on it and I want to highlight a few of them to give you some insight into the voodoo that I do.

There's some method to the madness, or so I like to pretend anyway.
We will start with the forward three. I never changed the role of the Inverted Winger but I did heavily tweak the other two offensive roles. Initially, they were both Shadow Strikers. I quickly found that because of their hardcoded behaviour, they moved all over the place but failed to act as a focal point for direct passes forward.

You can't remove the "move into channels" instruction, which sees these Shadow Strikers wander around aimlessly unless their movement is curbed by others.
The movement into channels of the Shadow Striker I kept, the left one, is now curbed by the presence of the attacking midfielder to his right and either the Mezzala or the Inverted Winger cutting inside on his left. This means he tends to move into the penalty area a lot, which is where we want him, penetrating that back-line.

The other attacking midfielder has morphed into a regular attacking midfielder, though with slightly modified instructions. We have asked him to hold up the ball, to allow team-mates to link up and generate more movement before playing a pass.

The Carrilero / Mezzala combination seems ideal and well-balanced, so I have not touched that specific pairing. I have tweaked the defensive midfielder and his role. Initially, this role was a Regista, because I love the forward drive the Regista offers. When the Mezzala surges forward, the Regista takes his place in central midfield.
This specific forward movement leaves the central defenders relatively unprotected however and since long balls over the top are rather accurate in this build of the match engine, I needed a more holding midfielder without entirely sacrificing all forward movement. The DLP on Support was the only possible compromise.
To combat these dreadfully accurate long passes, I have also changed the central defenders. Ball-playing defenders are great for your build-up from the back but they also tend to wander forward and get caught out of position. Regular defenders, one on cover-duty and one on defence should do nicely.
The final change (so far) took place in the right wing-back zone. Initially, a complete wingback on attack duty covered the entire flank. With the team's natural inclination towards the right side, this wing-back was often ignored or ended up isolated on the flank. An Inverted Wingback made more sense, to get him involved in the game far more often.
The playing style
Trying to define a playing style is difficult. For me, it's about the behaviour my players show as a collective when they try to achieve the team goals during the offensive, defensive and transitional phases of the game. You can try to define a style by looking how the team acts as they try to breach the opposing defence when on the attack, as they form up as a defensive unit and as they transition between the attacking and defensive phases.
The attacking phase
During the attacking phase of play, the aim is to get the forward three and the Mezzala into a position where they can hurt the opposing team. We want to break forward fast and take the game to the opposing team. Short passing is preferable to long balls but we want the passing to be incisive and not just keeping the ball without intent.

The instructions I have given to the squad gives them a sense of urgency without resorting to blindly hoofing the ball forward at the first opportunity.
Our transitional phase
When we lose the ball, I want to see elements of counter-pressing out on the pitch. We want to take the game to the opposition, put pressure on them. We will use the flanks to evade initial pressure and then break forward down the central areas.

Our defensive phase
To help with the pressing, we will play in a high defensive block. We will cede control of the flanks, allowing us to dominate the central areas of the pitch. All of our players are involved in defending, if only in harassing opposing players.

Balancing the phases
Each game phase, while treated on paper as an isolated phase in a match, actively influences what happens in the other phases. Take the counter-pressing I mentioned above. If I were to use counter-pressing but with a low defensive block, would it really be as effective? When we win the ball, it triggers the next game phase and if we want to break forward fast but are deep inside our own half, will it really be that effective?
Dividing a match into phases helps a manager to recognise recurring patterns but as a manager, you also have to make sure your instructions make sense and don't counter-act each other.
Additional information
I don't use Opposition Instructions. Well, almost never anyway. Training is something my assistant handles. Don't ask me about these things, because I honest-to-God hardly ever look at these aspects of the game.
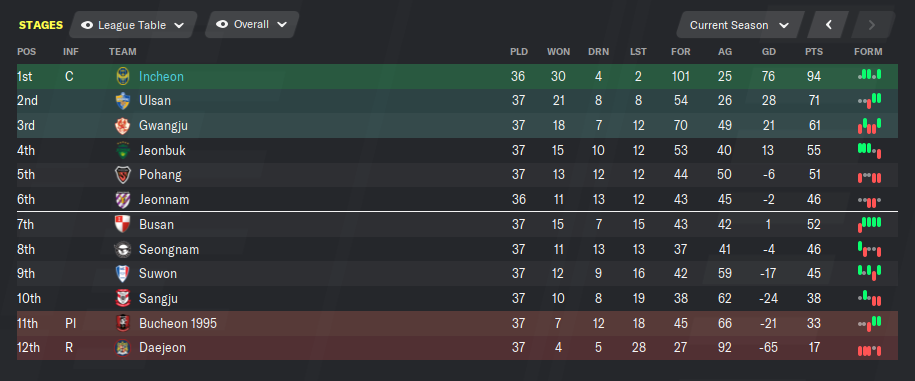
The results
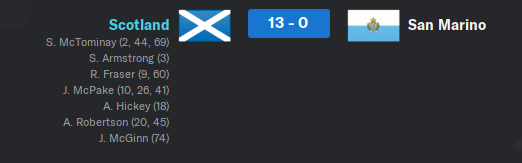
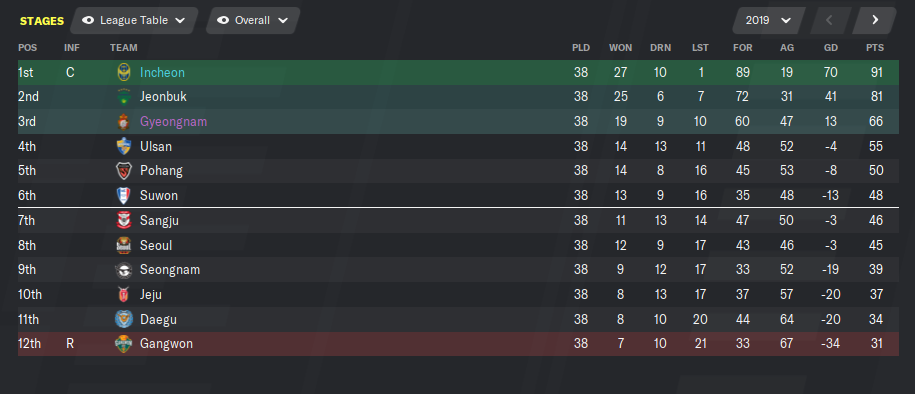
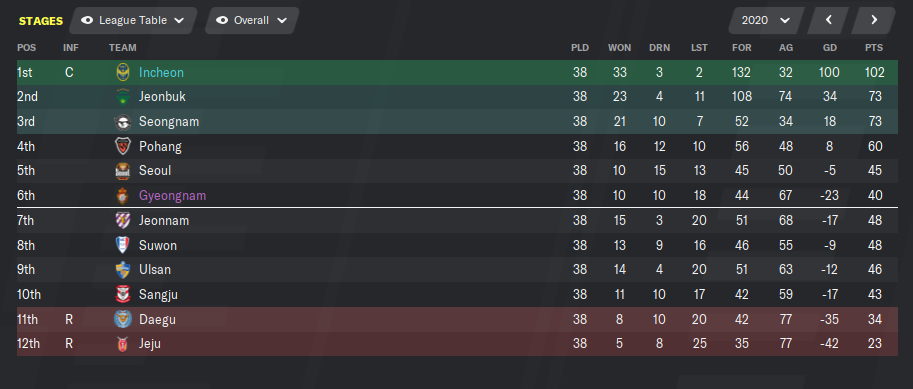
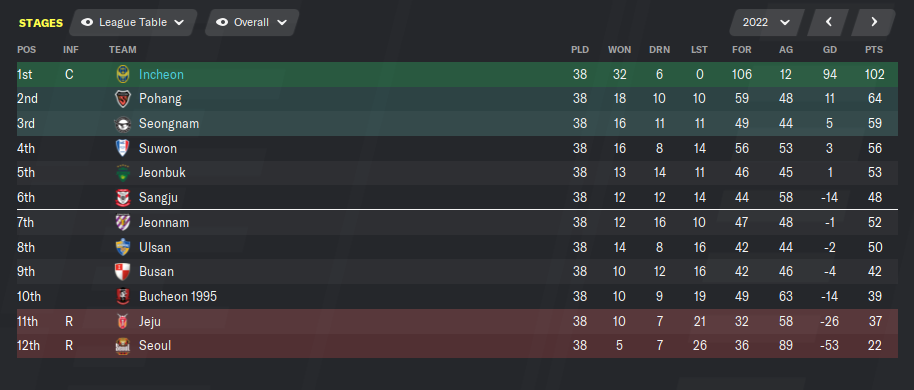
Well, I've been playing with this bad boy (and its predecessors) in South Korea, as well as with the Scottish national team.

In the past, I have always been a gamer who has a well-defined plan in mind and started tinkering with those ideas as a sort of end-goal I wished to achieve. Gungnir is different, for me anyway.
Instead of having a precise idea I wanted to use in the game, I started playing and shuffling with players and roles. The road to discovery mostly took place during the Beta phases of the game, where I was messing around with Ajax.
Ajax has an excellent squad for a strikerless enthusiast. Klaas-Jan Huntelaar is their only actual striker, and the array of talent in midfield is mindboggling both in term of their ability and their versatility. The squad also has a few strong left-footed wingers in David Neres and Dusan Tadic, while there are no strong right-footed wingers present.
The basic premise for the Gungnir setup was born out of necessity (and being too lazy to go scouting during Beta). The rest of the tactic built itself around this chaotic conduit I constructed in midfield, generating a fluid, sexy brand of football.
Come on, don't we all love some fluid, sexy football?
The shape
I usually start my tactics building from a 4-1-2-3-0 shape, and this one started (and ended up) similarly. A sweeper keeper, four defenders, one defensive midfielder, two regular midfielders and three players in attacking midfield make up our entire squad.
The concept
This entire team sets up towards misdirection of the opposition. An approach to the game we love to use is the misdirection. Create a conflict for the opposing team between what their players think we are going to do and what we are doing.
In other words, we use a tactical feint to draw a response from the opposing team, which usually creates an opening of some kind for us to exploit.
If we can get the AI to believe our players will behave a certain way while planning a different outcome altogether, we can take advantage of the fact that the defending team has conceded time and space by acting upon our feint. By changing their position and preparing for what they perceive is about to happen, they create a gap that didn't exist initially, while simultaneously limiting their own response time, allowing for team-mates to go on a rampage.
It's usually the IW, Shadow Striker or Mezzala running a rampage.
To make this feint work, we have to apply a third-and-fourth-man principle. Most of the time, the defending team will focus its attention on the player in possession of the ball and the player most likely to receive the ball next. If we can generate extra movement, these additional players can feed off each other's movement, making runs off the ball in anticipation of either receiving the ball from the original ball-carrier or the second man, the primary distraction. If you get this tactical feint right, your additional runners are often unmarked or untracked by a defender.
Either the ball-carrier is allowed space to make a move or he creates space for others.
While the entire concept of a feint starts with the initial positioning of a player, its majestic beauty lies with the movement of the players, or to be more exact, with the shadow runs your players make. Shadow runs are the movements of a player off the ball to drag a defender away from space so that a teammate can then benefit from the opening.
By reacting to such a shadow run while often spotting more movement from the offensive team, the defender has to choose between two evils. He must either: (1) track the run and vacate his position in the defensive line, creating space for others to exploit, or (2) maintain his position in the defensive line, hoping one of his team-mates will pick up the runner. (This assumes, of course, that the defender has seen both runs, and isn't focused solely on the distraction.)
Creating movement is paramount to making this tactic work, to creating the glorious chaos of movement that means there is always someone available to receive the pass.
During an average attack, you often situations like this, with the ball-carrier advancing on the defensive line and there are always four or more passing-options available to him.
By selecting player roles that work well together and feed off each other's movement, you can create that chaos. I admit there was a fair bit of trial and error here, but it starts with plainly knowing how a specific role behaves in the game in conjunction with other roles and on its own. @v_maedhros has written about this very subject before, and I have to admit I intend to edit his posts for FM20 and expand on them for the parts he hasn't covered.
https://strikerless.com/2018/05/16/understanding-roles-in-football-manager-and-real-life-part-1/ - Part I of the understanding roles series.
https://strikerless.com/2018/05/23/understanding-roles-in-football-manager-and-real-life-part-2/ - Part II of the understanding roles series
Reading and observing, tinkering with what I know, this is a chart of the movement the roles I do use tend to generate.
There was heavy tweaking in the player roles since Beta, mostly because certain patches nerfed the game and I needed to adapt. I will look at that later on in this article.
If you want to read more about that midfield setup and why it works the way it does, you ought to read an article I wrote with @seattle-red a few weeks before.
The Kansas City Shuffle – Rise of the Shadowganche
In the past, we have mentioned the Withdrawn Targetman saga and detailed various tactics built around a deep-lying, playmaking targetman — Guido’s patented targetganche. In their infini…
strikerless.com
Putting theory to practice
So what does it look like when you put it all into motion?
Video 1
Video 2
Video 3
Video 4
Go on, that looks pretty **** good, doesn’t it?
On a more serious note, the tactic is well-rounded. You would think (and probably rightfully so based on my earlier work) that a tactic built around feints and misdirection would be unstable in terms of its effectiveness. In this case, you would be wrong.
As you can see, fairly well-rounded.
While it is true that we score a lot of goals from through-balls, we score a lot of goals overall and we are doing quite nicely when it comes to crosses and set pieces as well.
Again, well-rounded when you look at the build-up.
We can see similar numbers when we look at where the assists are coming from. The way the tactic is setup offers variation, rather than exploiting a certain loophole. I'm fairly certain that according to popular views, that's a new tune for Strikerless.
The tactical (role) evolution of Gungnir
I'll not bore you with the name of the tactic. I just like my Norse mythology and ran with this name. **** off if you think it's pretentious, I like it.
Just try it. It won't hurt.
Tactical evolution though. The tactic has undergone changes since I started working on it and I want to highlight a few of them to give you some insight into the voodoo that I do.
There's some method to the madness, or so I like to pretend anyway.
We will start with the forward three. I never changed the role of the Inverted Winger but I did heavily tweak the other two offensive roles. Initially, they were both Shadow Strikers. I quickly found that because of their hardcoded behaviour, they moved all over the place but failed to act as a focal point for direct passes forward.
You can't remove the "move into channels" instruction, which sees these Shadow Strikers wander around aimlessly unless their movement is curbed by others.
The movement into channels of the Shadow Striker I kept, the left one, is now curbed by the presence of the attacking midfielder to his right and either the Mezzala or the Inverted Winger cutting inside on his left. This means he tends to move into the penalty area a lot, which is where we want him, penetrating that back-line.
The other attacking midfielder has morphed into a regular attacking midfielder, though with slightly modified instructions. We have asked him to hold up the ball, to allow team-mates to link up and generate more movement before playing a pass.
The Carrilero / Mezzala combination seems ideal and well-balanced, so I have not touched that specific pairing. I have tweaked the defensive midfielder and his role. Initially, this role was a Regista, because I love the forward drive the Regista offers. When the Mezzala surges forward, the Regista takes his place in central midfield.
This specific forward movement leaves the central defenders relatively unprotected however and since long balls over the top are rather accurate in this build of the match engine, I needed a more holding midfielder without entirely sacrificing all forward movement. The DLP on Support was the only possible compromise.
To combat these dreadfully accurate long passes, I have also changed the central defenders. Ball-playing defenders are great for your build-up from the back but they also tend to wander forward and get caught out of position. Regular defenders, one on cover-duty and one on defence should do nicely.
The final change (so far) took place in the right wing-back zone. Initially, a complete wingback on attack duty covered the entire flank. With the team's natural inclination towards the right side, this wing-back was often ignored or ended up isolated on the flank. An Inverted Wingback made more sense, to get him involved in the game far more often.
The playing style
Trying to define a playing style is difficult. For me, it's about the behaviour my players show as a collective when they try to achieve the team goals during the offensive, defensive and transitional phases of the game. You can try to define a style by looking how the team acts as they try to breach the opposing defence when on the attack, as they form up as a defensive unit and as they transition between the attacking and defensive phases.
The attacking phase
During the attacking phase of play, the aim is to get the forward three and the Mezzala into a position where they can hurt the opposing team. We want to break forward fast and take the game to the opposing team. Short passing is preferable to long balls but we want the passing to be incisive and not just keeping the ball without intent.
The instructions I have given to the squad gives them a sense of urgency without resorting to blindly hoofing the ball forward at the first opportunity.
Our transitional phase
When we lose the ball, I want to see elements of counter-pressing out on the pitch. We want to take the game to the opposition, put pressure on them. We will use the flanks to evade initial pressure and then break forward down the central areas.
Our defensive phase
To help with the pressing, we will play in a high defensive block. We will cede control of the flanks, allowing us to dominate the central areas of the pitch. All of our players are involved in defending, if only in harassing opposing players.
Balancing the phases
Each game phase, while treated on paper as an isolated phase in a match, actively influences what happens in the other phases. Take the counter-pressing I mentioned above. If I were to use counter-pressing but with a low defensive block, would it really be as effective? When we win the ball, it triggers the next game phase and if we want to break forward fast but are deep inside our own half, will it really be that effective?
Dividing a match into phases helps a manager to recognise recurring patterns but as a manager, you also have to make sure your instructions make sense and don't counter-act each other.
Additional information
I don't use Opposition Instructions. Well, almost never anyway. Training is something my assistant handles. Don't ask me about these things, because I honest-to-God hardly ever look at these aspects of the game.
The results
Well, I've been playing with this bad boy (and its predecessors) in South Korea, as well as with the Scottish national team.
